Linux development environment setup
Posted Dec. 1, 2025
Preparation (after OS installation)
-
Install recommended NVIDIA drivers: Open the "Software & Updates"
application, navigate to the "Additional Drivers" tab, and select the
recommended NVIDIA driver for your GPU. Apply the changes and reboot
when prompted. Alternatively, install via terminal:
sudo ubuntu-drivers devices sudo ubuntu-drivers autoinstall sudo reboot -
Power Management (Powertop): Linux's battery management on laptops
tends to be less optimized than other operating systems. Powertop
helps optimize power consumption and extend battery life. Install
with:
sudo apt update && sudo apt upgrade -y sudo apt install powertop -y sudo systemctl enable tlp -
GNOME: I use GNOME desktop environment for simplicity. To further
customize and optimize it, install GNOME Tweaks by running:
You can use GNOME Tweaks to adjust various settings such as themes, fonts, and extensions to enhance your desktop experience. Here are some of my favorite GNOME extensions:
sudo apt update && sudo apt upgrade -y sudo apt install gnome-tweaks -y- Dash to Dock: Turn the GNOME dash into a nice-looking dock for easier access to applications.
- Caffeine-NG: Prevents your computer from going to sleep or activating the screensaver when certain applications are running.
- Blur my Shell: Adds a blur effect to the GNOME shell elements for a sleek look.
- Vitals: Monitors system resources like CPU, RAM, and network usage directly from the top bar.
- If you want even more customization, consider KDE Plasma desktop environment. Personally, I prefer GNOME for its simplicity. I've used KDE before when I was still on Debian, but one thing I noticed is that it takes up more power and resources, and since I use a laptop, I prefer to save battery life with GNOME.
- GDM settings: lock screen customization, auto login, etc. Install GDM settings
with:
sudo apt install gdm3setup -y
Basic Rice
Simple GNOME desktop rice using fastfetch. Link to my config: github
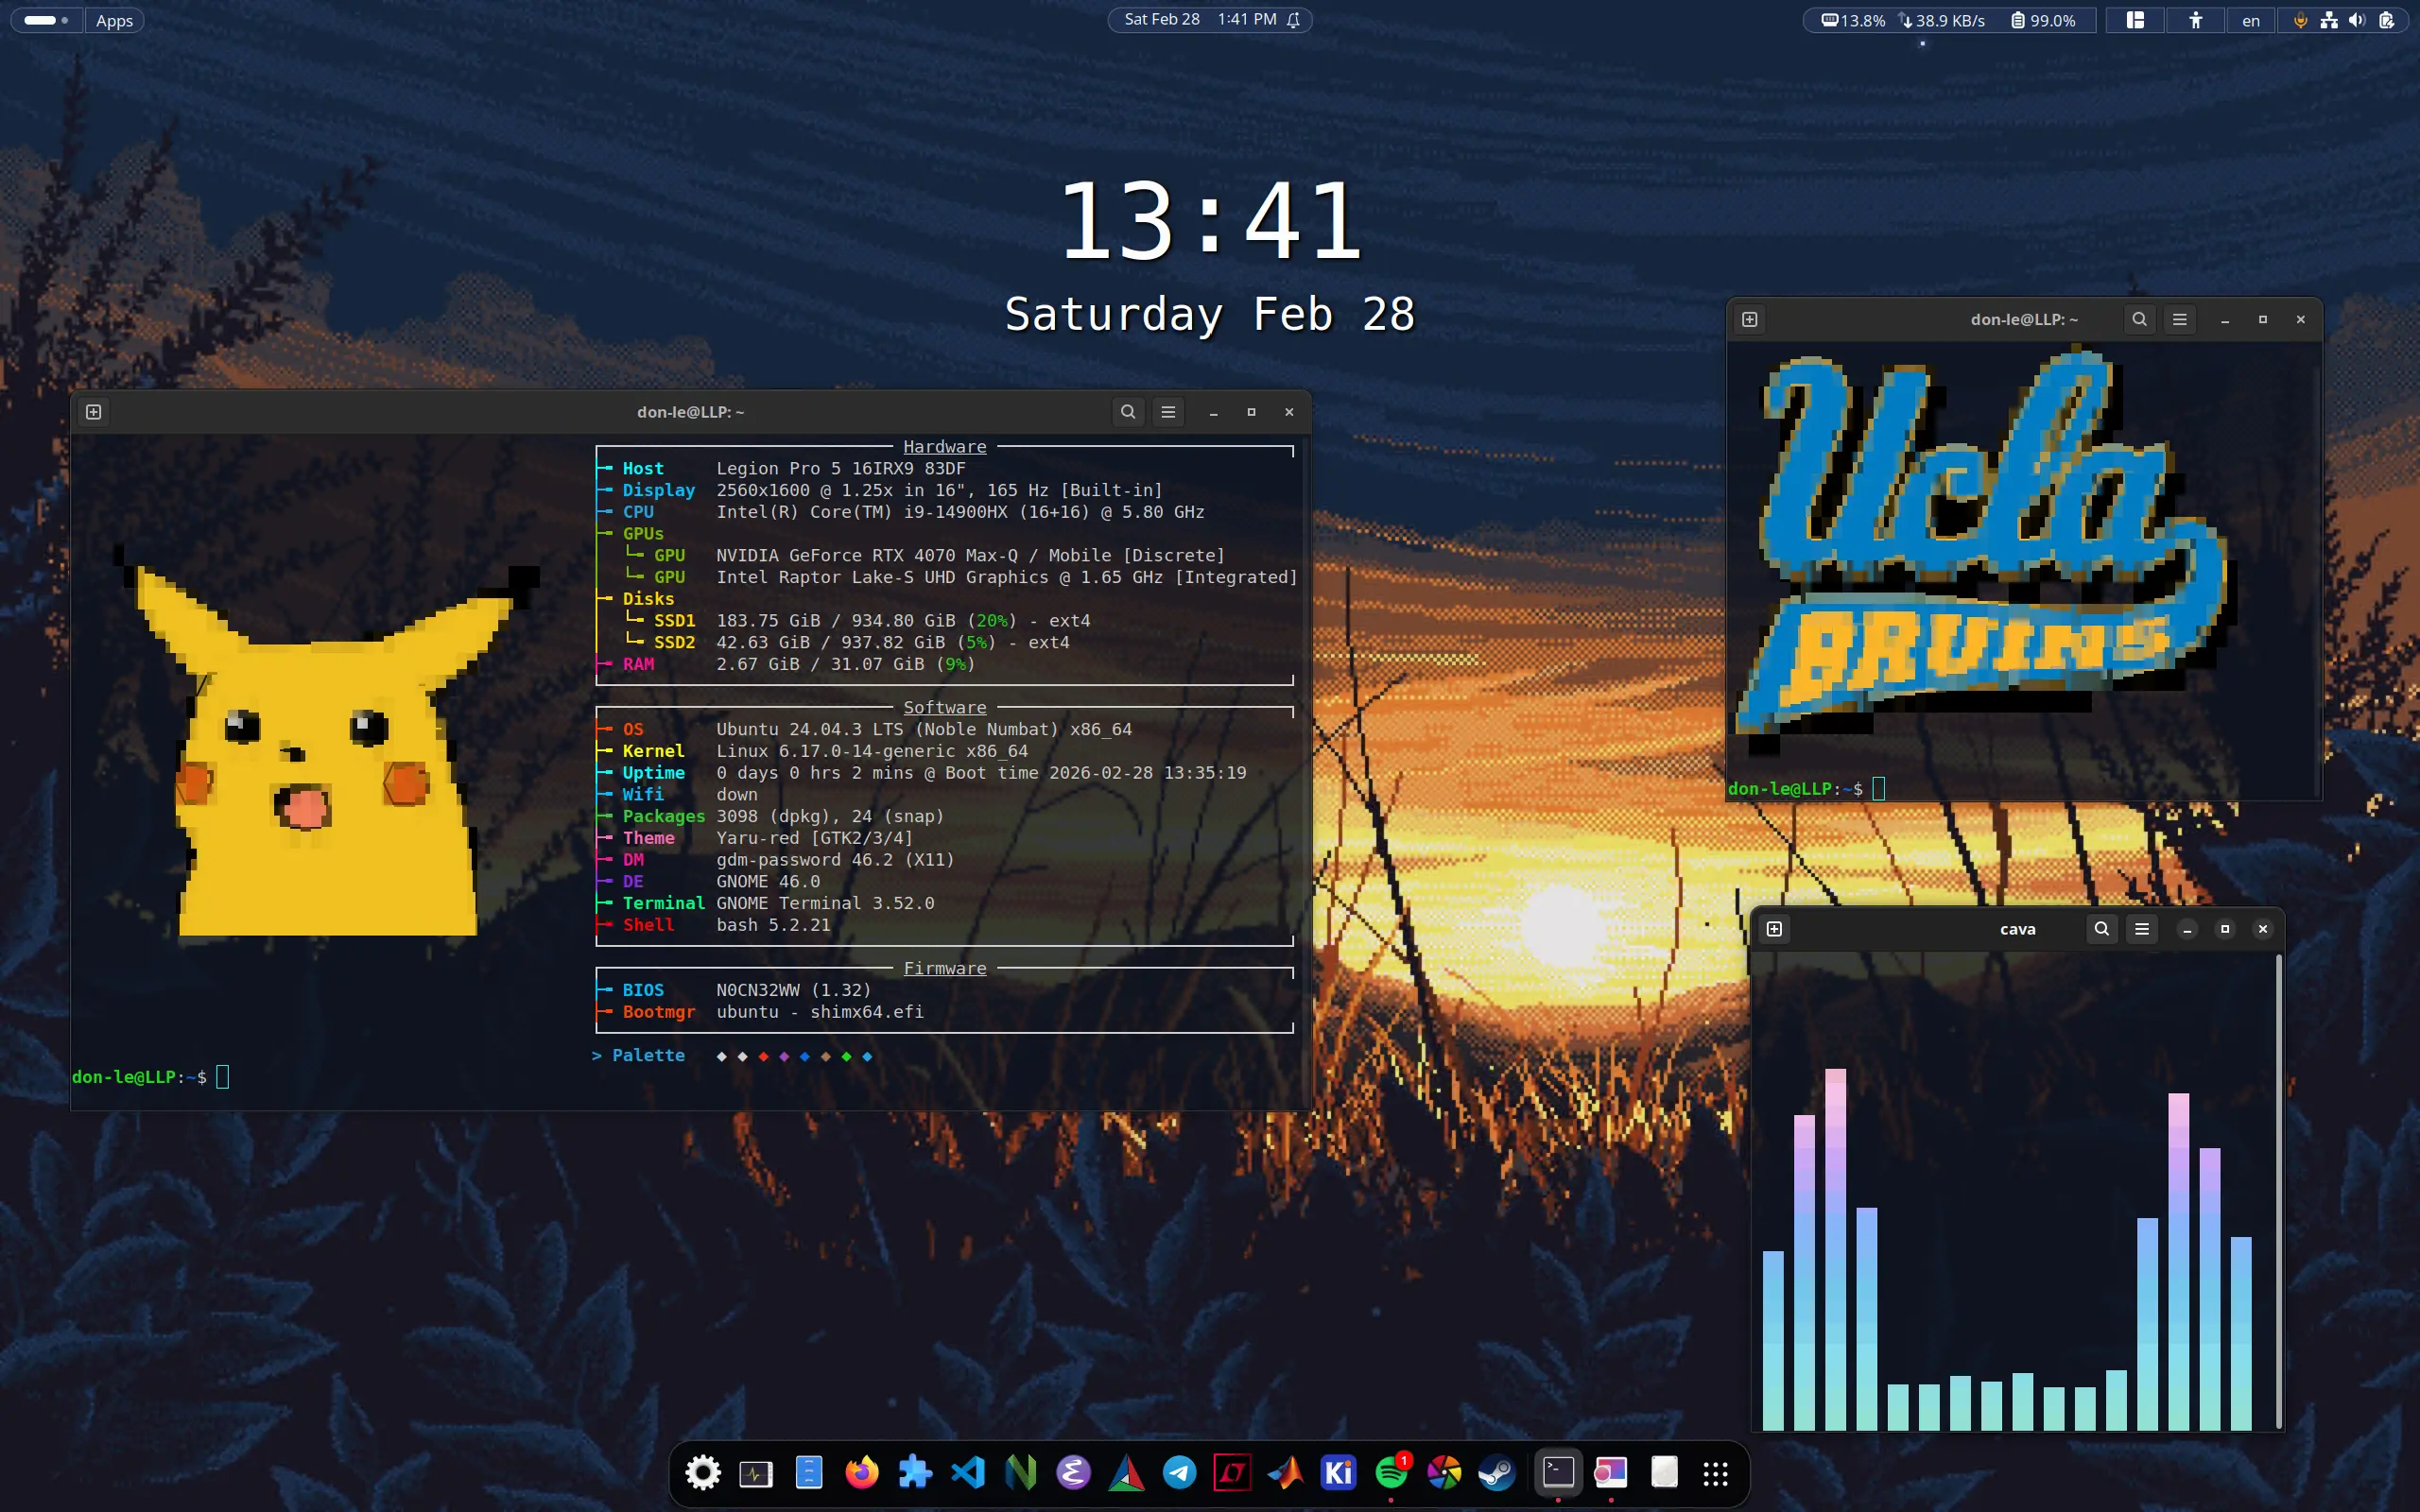
ucla-logo() {
    # Generate the logo on the fly
    local LOGO=$(chafa --size 50 --symbols block /home/img/ucla.png)

    # Print it
    echo -e "$LOGO"
}
Change Some Default Behaviors
-
Change keybinding: on Linux, copy and paste in the terminal is
defaulted as Ctrl+Shift+C and Ctrl+Shift+V. To change it to Ctrl+C and
Ctrl+V, open the terminal, then go to the burger menu, then
Preferences > Shortcuts, and change the Copy and Paste shortcuts.
After changing, restart the terminal. Now, Ctrl+Shift+C will be
automatically mapped to cancel command (SIGINT), and Ctrl+C and Ctrl+V
will work as expected for copy and paste
A quick word about Emacs
Please note that if you change this keybinding, and you're using Emacs, it will interfere with Emacs keybindings in the terminal. For example, Ctrl+C is used for various commands in Emacs. If you want to use Emacs keybindings, you can either keep the default Ctrl+Shift+C and Ctrl+Shift+V for copy and paste, or you can remap the copy and paste shortcuts to something else that doesn't conflict with Emacs. -
Better Bash autocompletion: Install bash-completion for improved
command-line experience:
After installation, verify, and then source it:
sudo apt update && sudo apt upgrade -y sudo apt install bash-completion -yNext, add the following line to yourecho $BASH_VERSION source /etc/bash_completion~/.bashrcfile to enable bash-completion automatically on terminal startup:The next thing I did is to enable a menu-style tab completion by adding the following lines toif [ -f /etc/bash_completion ]; then . /etc/bash_completion fi~/.inputrc:Finally, reload it with:# Show all matches immediately set show-all-if-ambiguous on # Enable menu-style completion TAB: menu-complete # Case-insensitive completion set completion-ignore-case on set completion-map-case on # Mark symlinked directories set mark-symlinked-directories onHow this works: let's say you're in a folder called UCLA, with the following folders inside:bind -f ~/.inputrcnow, when you press CS + Tab, it will rotate through different options of the CS folders. Then simply press enter to select the desired folder.ls UCLA CS-111 CS-180 CS-35L CS-M51A ECE-102 ECE-115C -
Remap certain keys (optional). One of the annoying things about
Laptops made in recent years is that they come with the copilot key,
which is located where the right Ctrl key should be. To remap it back
to Ctrl, first install keyd to tell which keycode corresponds to the
copilot key:
After installation, remember to verify with
sudo apt install keyd -y sudo systemctl enable keyd sudo systemctl start keydNext, monitor which keycode corresponds to the copilot key by running:whereis keyd systemctl status keydAdd the following tosudo keyd monitor # or sudo keyd.rvaiya monitor/etc/keyd/default.conf:Then, reload with[ids] * [main] leftshift+leftmeta+f23 = rightcontrol # this varies, adjust accordingly to your systemsudo keyd reload # or sudo keyd.rvaiya reload
DevOps and Text Editors
- VSCode: My
primary code editor. Simply use the Software Center to install it via
snap. If you dislike snap, install with:
Settings: on Linux, again, copy and paste is defaulted as Ctrl+Shift+C and Ctrl+Shift+V. To change it back to Ctrl+C and Ctrl+V, go to Settings > Keyboard Shortcuts, and paste the following JSON:
sudo apt update && sudo apt upgrade -y sudo apt install wget gpg -y wget -qO- https://packages.microsoft.com/keys/microsoft.asc | gpg --dearmor > packages.microsoft.gpg sudo install -o root -g root -m 644 packages.microsoft.gpg /usr/share/keyrings/ sudo sh -c 'echo "deb [arch=amd64 signed-by=/usr/share/keyrings/packages.microsoft.gpg] \ https://packages.microsoft.com/repos/code stable main" \ > /etc/apt/sources.list.d/vscode.list' sudo apt install apt-transport-https -y sudo apt update && sudo apt install code -y[ { "key": "ctrl+c", "command": "workbench.action.terminal.copySelection", "when": "terminalFocus && terminalProcessSupported && terminalTextSelected" }, { "key": "ctrl+v", "command": "workbench.action.terminal.paste", "when": "terminalFocus && terminalProcessSupported" }, { "key": "ctrl+shift+c", "command": "workbench.action.terminal.sendSequence", "args": { "text": "\u0003" }, "when": "terminalFocus" } ]A quick note about Snap
Snap is one of the most common criticisms of Ubuntu, mostly because of perceived performance issues. I am not a big fan of it either. That said, it is worth remembering that you don't have to use Snap at all if it does not fit your needs. Like many things in Linux, it comes down to preference and the flexibility to choose what works best for you. - Neovim: Terminal-based
text editor. Install with:
sudo apt update && sudo apt upgrade -y sudo apt install neovim -y - Git: Version control
system. Install with:
sudo apt update && sudo apt upgrade -y sudo apt install git -y - Docker:
Containerization platform. Follow the official installation guide:
# update and remove old versions
sudo apt update
sudo apt remove docker.io docker-doc docker-compose docker-compose-v2 podman-docker containerd runc

# install dependencies
sudo apt install ca-certificates curl gnupg

# add Docker's official GPG key
sudo install -m 0755 -d /etc/apt/keyrings
sudo curl -fsSL https://download.docker.com/linux/ubuntu/gpg -o /etc/apt/keyrings/docker.asc
sudo chmod a+r /etc/apt/keyrings/docker.asc

# add Docker apt repository
echo \
  "deb [arch=$(dpkg --print-architecture) signed-by=/etc/apt/keyrings/docker.asc] https://download.docker.com/linux/ubuntu \
  $(. /etc/os-release && echo "$VERSION_CODENAME") stable" | \
  sudo tee /etc/apt/sources.list.d/docker.list > /dev/null

# install Docker Engine
sudo apt update
sudo apt install docker-ce docker-ce-cli containerd.io docker-buildx-plugin docker-compose-plugin

# verify installation
sudo systemctl status docker
sudo docker run hello-world
C and C++ Development Environment
-
Essentials: Core development tools including build-essential, gdb,
g++-multilib, and related packages. Install with:
sudo apt install build-essential lldb ninja-build clang gdb g++-multilib -y - CMake and CMake GUI: Build
system generator with GUI support for easier project configuration. Install
with:
sudo apt install cmake cmake-qt-gui -y -
Package Managers:
- Vcpkg: Microsoft's C++ package manager. Install with:
Add the export lines to your .bashrc file to make them permanent.
cd ~ git clone https://github.com/microsoft/vcpkg ./vcpkg/bootstrap-vcpkg.sh export VCPKG_ROOT=~/vcpkg export PATH=$VCPKG_ROOT:$PATH - Conan: Alternative C++
package manager. Install with:
pip install conan
- Vcpkg: Microsoft's C++ package manager. Install with:
-
GPU Programming:
- CUDA Toolkit: GPU programming framework. Follow the installation instructions
on the
NVIDIA website. After installation, add these lines to your .bashrc:
Replace "13.1" with your installed version. Update the environment:
# CUDA Toolkit paths export PATH=/usr/local/cuda-13.1/bin:$PATH export LD_LIBRARY_PATH=/usr/local/cuda-13.1/lib64:$LD_LIBRARY_PATHto update the environment variables. Verify the installation by running:source ~/.bashrcnvcc --version - cuDNN: Deep learning library. Follow the instructions on the NVIDIA cuDNN website.
- CUDA Toolkit: GPU programming framework. Follow the installation instructions
on the
NVIDIA website. After installation, add these lines to your .bashrc:
-
Profiling:
- Valgrind: Memory
debugging, leak detection, and profiling tool. Install with:
sudo apt install valgrind -y -
Perf: Performance analysis tool. Install with:
sudo apt install linux-tools-common linux-tools-$(uname -r) -y
- Valgrind: Memory
debugging, leak detection, and profiling tool. Install with:
-
Common Libraries:
- Boost:
Comprehensive C++ library collection. Install with:
sudo apt install libboost-all-dev -y - Eigen:
C++ template library for linear algebra. Install with:
sudo apt install libeigen3-dev -y - OpenMPI:
Parallel programming framework. Install with:
sudo apt install libopenmpi-dev openmpi-bin -y - FFTW: Discrete
Fourier transform library. Install with:
sudo apt install libfftw3-dev -y
- Boost:
Comprehensive C++ library collection. Install with:
Python and Anaconda
- Python: Most
Linux distributions include Python by default. Check your version:
To prevent pip from installing packages globally (which helps keep your system clean), create a pip configuration file:
python3 --versionmkdir -p ~/.config/pip echo "[global]" > ~/.config/pip/pip.conf echo "user = true" >> ~/.config/pip/pip.conf - Anaconda:
Python development and package management platform. Download the
installer from the
Anaconda website and follow the installation instructions. Verify installation:
Managing your Anaconda environments:
source ~/.bashrc conda --version-
Prevent Auto-Activation: If you don't want the (base)
environment to start every time you open a terminal, run:
conda config --set auto_activate_base false -
Create a New Environment: To create a new environment with a
specific Python version, run:
conda create -n myenv python=3.10 -
Activate an Environment: To activate an environment, run:
conda activate myenv -
Deactivate an Environment: To deactivate the current
environment, run:
conda deactivate
PIP_REQUIRE_VIRTUALENV=false -
Prevent Auto-Activation: If you don't want the (base)
environment to start every time you open a terminal, run:
JavaScript and Web
- Node.js and npm: JavaScript
runtime and package manager. Install with:
sudo apt install nodejs npm -y -
Yarn: Alternative JavaScript package manager. Install with:
npm install -g yarn -
Cwebp: WebP image conversion tool. Install with:
Now, you can convert images to WebP format using the cwebp command. For example:
sudo apt install webp -y# Convert PNG to WebP cwebp input.png -o output.webp # Batch convert all PNGs for file in *.png; do cwebp "$file" -o "${file%.png}.webp"; done
Rust and Cargo
- Rust and Cargo:
Systems programming language with built-in package manager. Install
with:
curl --proto '=https' --tlsv1.2 -sSf https://sh.rustup.rs | sh
source $HOME/.cargo/env
Verify the installation by running:
rustc --version
cargo --version
Engineering Softwares
- MATLAB: Numerical computing environment. Download from MathWorks and
follow their installation instructions. To add MATLAB to your
application menu, create
~/.local/share/applications/matlab.desktopwith this content:Then, refresh the application menu by running:[Desktop Entry] Version=1.0 Type=Application Name=MATLAB Comment=MATLAB Numerical Computing Environment Exec=/usr/local/MATLAB/R2024a/bin/matlab -desktop Icon=/usr/local/MATLAB/R2024a/bin/glnxa64/cef_resources/matlab_icon.png Terminal=false Categories=Development;Science;Engineering;Note that in some cases, Linux might not let you update or install new packages due to MATLAB installation not having access to root. If that's the case, then you need to give yourself ownership of the MATLAB install:update-desktop-database ~/.local/share/applications/then ensure write permissionsudo chown -R $USER:$USER /usr/local/MATLAB/R2025bchmod -R u+rw /usr/local/MATLAB/R2025b - KiCAD: PCB design
software. Install with:
sudo apt install kicad -y - LTspice: Circuit simulation tool. LTSpice is mainly a Windows
application, but it can be run on Linux using Wine. Follow
instruction on how to install wine on Ubuntu on their official website. Next, download and install LTspice (64 bit) using Wine:
Next, simply start and run the application with
cd ~/Downloads wget https://LTspice.analog.com/download/latest/LTspice64.msi wine msiexec /i LTspice64.msiYou can also create a desktop shortcut for easier access. First, create the launcher file. Run this command to create a new .desktop file:wine ~/.wine/drive_c/users/$USER/AppData/Local/Programs/ADI/LTspice/LTspice.exeThen, add the following content to the file:nano ~/.local/share/applications/ltspice.desktopFinally, make it executable[Desktop Entry] Name=LTspice Comment=Analog Devices LTspice Circuit Simulator Exec=wine /home/don-le/.wine/drive_c/users/don-le/AppData/Local/Programs/ADI/LTspice/LTspice.exe Icon=application-x-ms-dos-executable Terminal=false Type=Application Categories=Education;Electronics;Engineering;chmod +x ~/.local/share/applications/ltspice.desktop - Audacity:
Audio editing software. Install with:
sudo apt install audacity -y - Master PDF Editor: PDF editing software. Installation steps:
- First, download the installer from the Master PDF Editor website.
-
Next, open the terminal and navigate to the directory where
the installer was downloaded, then install it via apt.
cd ~/Downloads sudo apt install ./master-pdf-editor*.deb -
Then, run the installer with:
./master-pdf-editor-*.run - Follow the on-screen instructions to complete the installation.
Other Useful Softwares
- Firefox
- Spotify:
sudo apt update && sudo apt upgrade -y curl -sS https://download.spotify.com/debian/pubkey_0D811D58.gpg | sudo gpg --dearmor -o /usr/share/keyrings/spotify-archive.gpg echo "deb [signed-by=/usr/share/keyrings/spotify-archive.gpg] http://repository.spotify.com stable non-free" | sudo tee /etc/apt/sources.list.d/spotify.list sudo apt update && sudo apt install spotify-client -y - VLC Media Player: Versatile media player. Install with:
sudo apt install vlc - ksnip:
Equivalent of Window's snipping tool, a screenshot tool with
annotation features. Install with:
sudo apt install ksnip -y - Telegram:
Messaging app. Install with:
sudo apt install telegram-desktop -y
Final Words
Try not to worry too much about what other people say. Choose what works best for you, but take some time to research before settling on a distro. Some people prefer Arch's rolling release, while I value the stability and long-term support that Ubuntu provides. The best way to learn is by exploring different options and discovering what fits your workflow and preferences. Linux is built around choice and customization, so experiment freely and shape it into something that feels right for you.